Friday, June 5, 2009
Wednesday, May 6, 2009
They Don't Come Better than Liv Tyler
Look at this stunning Stella McCartney gown on super stunning Liv Tyler. This lady's on my make out list:
What we can learn from this:
- Set off pale skin with a deep gem-tone--everything about you will light up.
- You can go for a super-deep v-neck without looking trashy if it's in the context of something refined, i.e. a wrap dress with cap sleeves.
- A little cinch goes a long way. The tonal belt/hem at the waist keeps your eye on the narrowest part of her torso. It enhances her figure, and it's not so tight that she's bulging out around it.
- When you're going dramatic in the dress (color, cut, length), keep the makeup simple. Liv looks fresh, clean, and dewy. Dark lipstick and cat eyes would've turned the dress costume-y.
- Show a little leg. There's a slit. It's in the front. She's poking her foot out of it coyly. Just do as she does.
Sunday, May 3, 2009
Perfect retro shoes
My friend Karyn has an excellent sense of style, one that is very much her own. Last night at dinner I noticed she was wearing a beautiful pair of spring-green peep-toes, and thankfully she pointed me to the Re-Mix Vintage Shoes Web site, a great resource for vintage reproductions from the 1920s through the 1970s. Karyn says not only do the shoes look great on, but they're also incredibly comfortable, great for city walking. Some of my favorites below.
I'll take the chocolate browns, please:
Don't know what I'd do without red shoes:
And the ever-fabulous metallic wedge:
I'll take the chocolate browns, please:
Don't know what I'd do without red shoes:
And the ever-fabulous metallic wedge:
Friday, May 1, 2009
The perfect dress...
...for a spring/summer wedding guest. From Keith Lissner's collection of cocktail dresses.
This came to me by way of DailyCandy, which, if you aren't already subscribed, you probably should be.
Wednesday, April 29, 2009
Perfect for your first day of junior high, 1992
From a real guilty pleasure blog, Go Fug Yourself:
by Jessica
Oh my god.
[Photo:Splash News]
I can't believe they still sell this dress. It makes me wonder what else they're going to start selling from 1992. Sure, I get that plaid is back and grunge has been sort of re-envisioned, but this? This is like pure suburban mall rat, mid-July, grabbing an Orange Julius before drifting over to Express to look at the polyester, flower-printed skorts and then reluctantly going to the bookstore to buy the books on your summer reading list that you are never going to read, despite your best intentions, because even for those of us who would read a book on a hike if we could do it without walking into a tree, homework is just not enticing when it's 101 degrees outside. Sadly, this dress did not do much for me in 1992 and it's not doing a ton for Miss Anne right now. On the other hand, at least she doesn't have homework waiting for her. Presumably.
Tuesday, April 21, 2009
Gorgeous Spring Shoes
Coclico seems to know exactly what my Spring wishlist looks like.
And this naughty number's on sale...
Saturday, April 18, 2009
Facebook tell me what shoe defines me
You are defined by Christian Louboutins
You are a sexy and slinky with an edge. There is an aire of mystery about you as you prowl. People around recognize you immediately, but don't much about you, and that's the way you like it; to keep them guessing!
First of all, who wouldn't love to be described this way. Second, I need to figure out how I fixed the quiz so that Christian Louboutin would be the result. Third, does being defined by CLs earn me a free pair? Please? Hello?
Monday, April 13, 2009
Foamy, Minty Goodness
A truly sublime note from my friend Nikki about the bestest cure-all ever...I hope you enjoy this delerious and fantastic rant as much as I did!
OMG, Jillian. It's almost 4AM but I just had the most fascinating revelation about hand soap that I wanted to share with you. For years I've been trying to figure out how not to keep buying those expensive soap dispensers full of gloppy soap that gets used up so quickly (and results in lots of wasted plastic). For a while our household was refilling the bottles with diluted Dr. Bronners, but the soap was so watery that there was always a puddle around the sink from it leaking everywhere. My brother tried something similar, but he didn't dilute the Dr. Bronners and it resulted in caked up soap that caused a misfire every time you pressed the dispenser (soap would squirt all over your shirt).
Tonight the solution finally presented itself: for weeks I've been watching our latest purchase of Kiss My Face grapefruit and bergamot foaming hand soap dwindle. It finally ran out tonight and I filled the empty bottle with half water and two big squirts of Dr. Bronners. Voila! The foaming dispenser worked its magic, and I'm never buying hand soap ever again. No puddles, no soiled shirts. Only foamy minty goodness.
Actually, all of us in this apartment use Dr. Bronners for just about everything: We have two big bottles in the shower instead of bar soap, and I also use it for hand washing my delicates (cashmere, wool, silk). My good friends use it to bathe their cat.
Dr. Bronners is a modern day panacea.
Friday, April 10, 2009
The Joy of Finding Perfect Boots
This is a post by my friend Kajal, who originally published this on her own blog:
For at least two years, I've been hunting a pair of knee-high burgundy boots. The perfect pair is not as easy to come by as you might think. I even had my fashionista sister in on the search, who collects shoes as a hobby and actually shops for a living. I learned my best chance was scouring vintage stores, which would take forever, and sadly accepted that another winter had slipped away without including these long imagined boots.
And then ... the perfect storm of opportunity.
I happened to make a point to read this week's Time Out,whose subscription has lapsed but they still happen to still send it to me,and they happened to list an attractive clearance sale at a small vintage shop called Sweet Tater,which happened to not be far from the subway I'd be taking to Bay Ridge for wine club,which happened to be on the important un-picked-over first day of the giant sale,and I happened to have a few extra minutes.
They're perfect.
(Excuse the dirt on my mirror.)
Despite being from the 70's, the leather is like new. They're perfectly broken in. Regular $165. For me, the sick price of $40. Since that's robbery, I bought pair of wooden platform sandals too. I did it for the economy.Bring spring on, but I'll be in my boots.
Thursday, March 26, 2009
It's not hard to: look like Gwyneth Paltrow?
I'm sick and miserable and my fever won't quit, so I can't tell for sure if I'm delirious or if Gwyneth Paltrow's GOOP blog just did an EXCELLENT job of putting together an incredibly chic uniform that really anyone could wear all the time and always look amazing: http://goop.com/newsletter/3. Scroll down for pics of how she puts a bunch of outfits together using interchangeable neutral pieces, as well as where she bought the one's she's wearing (take note, a bunch of stuff is from Uniqlo).
I'll tell you this: Right now, I am in love.
Saturday, March 21, 2009
It's not hard to: get a great, affordable haircut in bklyn
Recently, reader Shawn wrote in asking for help getting a decent haircut:
"how can a girl get an affordable, attractive haircut in NYC? I like to keep it short, but keeping it short means more frequent cuts. Recently, I visited a salon in my neighborhood advertising a $30 cut for short hair, but I walked out paying $60 (not including a tip). How does this happen?...What does $30 get me?...I like short hair, but I'm finding it hard to look good."
Shawn, I asked around, got myself a haircut, and found the answer: Salon Van Sickel in Brooklyn Heights (34 Middagh Street, 718-246-5500). Their price range for cuts is $25-$55--my short haircut only cost $40--and they're super reasonable for color as well. I went to Diana, who works Wednesday through Saturday, and I'll be going back to her again because I think she did a great job giving me the French New Wave pixie cut I wanted.
So, Shawn, the answer is: $30 may not get you much, a smidge more gets you just what you're looking for.
Wednesday, March 18, 2009
I'm in love...
...with Hadley Freeman's book The Meaning of Sunglasses: And a Guide to Almost All Things Fashionable.
I have yet to find a writer more in line with my own sense of style, and she delivers her message with tremendous wit, intelligence, and articulation to boot. Go read the first few pages on Amazon; if you're interested in flipping through the book and you're in Brooklyn, visit Powerhouse Books in DUMBO.
Saturday, March 7, 2009
This weekend: Clean up your nails!
I'm not even thinking polish--these days, it's about simplicity for me, and I follow a really simple process for keeping my hands and nails looking healthy and neat all week long. It's more than just filing, but from start to finish, it only takes about fifteen minutes--seriously, you can do it while waiting for water to boil or coffee to brew.
Oh, and before we even go through these easy steps, I suppose it's important to remind you: DON'T bite your nails and DON'T pick at your cuticles. I know we've all got our nervous habits, but please, if chewing on dead skin is yours, develop a new one.
Let's start with the usual: Trimming
Seems easy enough, right? What you need to keep in mind is that you never want to clip past the whites of your nails--don't cut your nails down to little nubbins. If you go too short you're exposing very fragile skin to the air, and leaving it open for infection. You want to still be able to feel a lite tickle when you run your nails over your skin.
Filing comes next, because that harsh metal clipper couldn't care less about smooth edges. Be gentle with the file and use it just to shape the sides and slough off any excess from the clipper.
Now here's the fancy part. Go to the drug store and pick up one of those 2-in-1 files, where one side buffs the nail body and the other shines it--all you do is gently run each side over your nail bed (not your nail tip, which you've just trimmed and filed).
The buffer side is great if your nails are a bit ridgy, and the shine side is perfect for me, since I prefer a natural, healthy look on my hands (toes are different--I give myself an all-out pedi on those babies because I LOVE the look of dark polish on white feet).
Next: Squeaky Cleaning:
Sometimes I get a toothbrush from my dentist, or my mom gives me an extra because she bought a pack of ten on her last trip to BJs. I generally don't use them for brushing my teeth, but give them other primping responsibilities--one becomes my lip scrubber, another my eyebrow exfoliator, etc. This orange number became my nail brush, and after I clip, file, and buff/shine, I do a bit of scrubbing with soapy water to remove any dirt or filings that are hanging around.
Then the really fancy part: Cuticle Care
This step is important, and it's the difference between meh hands and manicured hands. I use Sally Hansen's Gel Cuticle Remover because it's the least messy and least time-consuming. After applying the gel around the edges of all your nails, you let it sink in for five or six minutes, then press your cuticles back on all sides (I use the blunt end of the nail clipper to do this). The hardest part is accepting that, for five minutes out of your day, you've got goo on your hands and therefore can't really do anything with them.
After you've pressed back your cuticles, you rinse with soap and water.
Last but not least: Moisturize!
Ideally, if I was as eternally primed for primping as I'd like to be, I'd have a little tube of moisturizer in the following places:
-My handbag
-My desk at work
-My bathroom
-My nightstand
As it stands, I've got one that roams the house, and one that I always forget I have on my desk, so there's room for improvement there. Moisturizer is huge in keeping your hands looking healthy and fresh. Always wash your hands before you moisturize, this way you're not using an oil-based product to spread dirt and germs around. You don't need much--a dime-sized drop'll do it--just be consistent with it to prevent cracking, chapping, redness, and dry cuticles, which I KNOW is why so many people end up picking or biting at their nails.
I hope you all enjoyed the glorious morning--I went for a run! Around a track! And it felt GOOOOOOOD!!!
Oh, and before we even go through these easy steps, I suppose it's important to remind you: DON'T bite your nails and DON'T pick at your cuticles. I know we've all got our nervous habits, but please, if chewing on dead skin is yours, develop a new one.
Let's start with the usual: Trimming
Seems easy enough, right? What you need to keep in mind is that you never want to clip past the whites of your nails--don't cut your nails down to little nubbins. If you go too short you're exposing very fragile skin to the air, and leaving it open for infection. You want to still be able to feel a lite tickle when you run your nails over your skin.
Filing comes next, because that harsh metal clipper couldn't care less about smooth edges. Be gentle with the file and use it just to shape the sides and slough off any excess from the clipper.
Now here's the fancy part. Go to the drug store and pick up one of those 2-in-1 files, where one side buffs the nail body and the other shines it--all you do is gently run each side over your nail bed (not your nail tip, which you've just trimmed and filed).
The buffer side is great if your nails are a bit ridgy, and the shine side is perfect for me, since I prefer a natural, healthy look on my hands (toes are different--I give myself an all-out pedi on those babies because I LOVE the look of dark polish on white feet).
Next: Squeaky Cleaning:
Sometimes I get a toothbrush from my dentist, or my mom gives me an extra because she bought a pack of ten on her last trip to BJs. I generally don't use them for brushing my teeth, but give them other primping responsibilities--one becomes my lip scrubber, another my eyebrow exfoliator, etc. This orange number became my nail brush, and after I clip, file, and buff/shine, I do a bit of scrubbing with soapy water to remove any dirt or filings that are hanging around.
Then the really fancy part: Cuticle Care
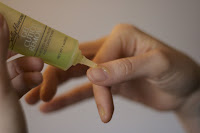
This step is important, and it's the difference between meh hands and manicured hands. I use Sally Hansen's Gel Cuticle Remover because it's the least messy and least time-consuming. After applying the gel around the edges of all your nails, you let it sink in for five or six minutes, then press your cuticles back on all sides (I use the blunt end of the nail clipper to do this). The hardest part is accepting that, for five minutes out of your day, you've got goo on your hands and therefore can't really do anything with them.
After you've pressed back your cuticles, you rinse with soap and water.
Last but not least: Moisturize!
Ideally, if I was as eternally primed for primping as I'd like to be, I'd have a little tube of moisturizer in the following places:
-My handbag
-My desk at work
-My bathroom
-My nightstand
As it stands, I've got one that roams the house, and one that I always forget I have on my desk, so there's room for improvement there. Moisturizer is huge in keeping your hands looking healthy and fresh. Always wash your hands before you moisturize, this way you're not using an oil-based product to spread dirt and germs around. You don't need much--a dime-sized drop'll do it--just be consistent with it to prevent cracking, chapping, redness, and dry cuticles, which I KNOW is why so many people end up picking or biting at their nails.
I hope you all enjoyed the glorious morning--I went for a run! Around a track! And it felt GOOOOOOOD!!!
Tuesday, March 3, 2009
Stylish Writing
One of my first thoughts when I decided to start a style blog was, 'well, I'll need a journal for all my ideas and inspirations--a stylish journal...'
This lovely, metallic-emblazoned number is now mine. I highly recommend Joy Deangdeelert Cho's stationery, and her blog is filled with the most beautiful things EVER: http://ohjoy.blogs.com/.
Labels:
blogs,
inspiration,
pretty things,
stationery
Wednesday, February 25, 2009
It's not hard to: accessorize a bridesmaid's dress
Let's start with the dress:
Source: http://www.jcrew.com/browse/single_product_detail.jsp?PRODUCT%3C%3Eprd_id=845524441771630&FOLDER%3C%3Efolder_id=2534374302025056&srcCode=FRGL09
This is my first time being a bridesmaid, and I couldn't be more excited. The dress is great, and perfect for the occasion--an evening wedding in July at the Brooklyn Botanic Gardens--because it's bright and airy and yet still formal. Plus, the cut and color of the dress is flattering on just about anyone.
In general, I'm a lady who likes her neutrals--blacks, browns, grays, navies--so you'd think adjusting to the light aqua color of the dress would be a challenge. And sure, the dress would look wonderful with any variety of metallics (truly the best of the neutrals; ah, gold and silver, what would I do without you?). But rather than go my usual route, I've decided to embrace the light, breezy, summer spirit of the dress, and to turn the aqua into the 'neutral' base.
Choosing to forgo neutrals is tough, but it's important to realize that, when you're working with a solid-color dress in a great cut, your options are almost as limitless as if you were working with a black dress. In fact, adding colored accessories to a black dress can easily come across as tacky or too reminiscent of '80s style (think bright yellow heels or a red leather bag).
Which is all to say, it's not hard to accessorize a bright summer bridesmaid's dress.
Rule #1: Get permission from the bride-to-be.
Before I pursued any accessories options, I emailed my friend to make sure I wasn't going against her aesthetic. Luckily for me, my friend is far from a bridezilla. I got the okay to accessorize to my heart's content.
Rule #2: Put yourself in context.
The Brooklyn Botanic Gardens is schmancy. The bride is wearing a creamy white satin sheath. The groom and all the groomsmen are wearing tuxes. There will be 200+ guests. Clearly now isn't the time for polkadots or excessive bangle bracelets*. I had to imagine myself posing in pictures with the bridal party, or crying during the exchanging of the vows, or dancing with my babe in his tux, and in all of those instances I wanted to be appropriately coordinated with the overall theme: a classic, sophisticated wedding.
*For the record, I think there's rarely a time for polkadots or excessive bangle bracelets.
Rule #3: Identify your color palette.
After considering context I determined the best direction for me to go color-wise was the rose family (reds, pinks, and purples). Aquas and roses play well together--they're at once cool and warm, and with the right tones they radiate an air of pure, lush, luxurious romance. Plus, with my pale skin, aquas can sometimes call attention to the bluish greens of my veins, so it's important to balance that out with some warmth. A rosey palette calls attention to my rosier attributes, like my lips and cheeks.
Rule #4: Choose your accessories sparingly.
Using a bright color as my neutral base, I understood I was walking a fine line between romantic original and overdone quirk. Knowing that a little bit of complimentary color goes a long way, I considered a few very basic accessories.
I have my dress a full five months in advance of the wedding, so I've got plenty of time to shop around for just the right rosey tones to build my ideal look. And with free shipping and free returns at Zappos, I could easily order ten pairs of heels in shades of magenta, plum, and scarlet and have a fashion show in my very own living room.
I'll also be thinking about family jewelry. Not heirlooms, mind you, but I'll see what delicate gold pieces my mother's picked up over the years, because often the perfect piece with just the right amount of age and personality is sitting in a jewelry box in the closet.
Regarding hair adornments, I have full faith that Etsy will come through for me with a unique, picture-perfect piece, though it may take patience and digging to find it.
Rule #6: Try it on together, and try more than one look!
There's no harm in working an outfit a few different ways. The more looks I can create with accessories, the better my chances are that I'll find the perfect look for the wedding and be inspired to wear the dress again. Having too many fabulous ways to wear a dress is a good problem.
I'll be posting pictures of my adventures in accessorizing as I gather the materials, so stay tuned. In the meantime, email me with suggestions for my "It's Not Hard to..." series. Thanks for reading my very first style post!
Source: http://www.jcrew.com/browse/single_product_detail.jsp?PRODUCT%3C%3Eprd_id=845524441771630&FOLDER%3C%3Efolder_id=2534374302025056&srcCode=FRGL09
This is my first time being a bridesmaid, and I couldn't be more excited. The dress is great, and perfect for the occasion--an evening wedding in July at the Brooklyn Botanic Gardens--because it's bright and airy and yet still formal. Plus, the cut and color of the dress is flattering on just about anyone.
In general, I'm a lady who likes her neutrals--blacks, browns, grays, navies--so you'd think adjusting to the light aqua color of the dress would be a challenge. And sure, the dress would look wonderful with any variety of metallics (truly the best of the neutrals; ah, gold and silver, what would I do without you?). But rather than go my usual route, I've decided to embrace the light, breezy, summer spirit of the dress, and to turn the aqua into the 'neutral' base.
Choosing to forgo neutrals is tough, but it's important to realize that, when you're working with a solid-color dress in a great cut, your options are almost as limitless as if you were working with a black dress. In fact, adding colored accessories to a black dress can easily come across as tacky or too reminiscent of '80s style (think bright yellow heels or a red leather bag).
Which is all to say, it's not hard to accessorize a bright summer bridesmaid's dress.
Rule #1: Get permission from the bride-to-be.
Before I pursued any accessories options, I emailed my friend to make sure I wasn't going against her aesthetic. Luckily for me, my friend is far from a bridezilla. I got the okay to accessorize to my heart's content.
Rule #2: Put yourself in context.
The Brooklyn Botanic Gardens is schmancy. The bride is wearing a creamy white satin sheath. The groom and all the groomsmen are wearing tuxes. There will be 200+ guests. Clearly now isn't the time for polkadots or excessive bangle bracelets*. I had to imagine myself posing in pictures with the bridal party, or crying during the exchanging of the vows, or dancing with my babe in his tux, and in all of those instances I wanted to be appropriately coordinated with the overall theme: a classic, sophisticated wedding.
*For the record, I think there's rarely a time for polkadots or excessive bangle bracelets.
Rule #3: Identify your color palette.
After considering context I determined the best direction for me to go color-wise was the rose family (reds, pinks, and purples). Aquas and roses play well together--they're at once cool and warm, and with the right tones they radiate an air of pure, lush, luxurious romance. Plus, with my pale skin, aquas can sometimes call attention to the bluish greens of my veins, so it's important to balance that out with some warmth. A rosey palette calls attention to my rosier attributes, like my lips and cheeks.
Rule #4: Choose your accessories sparingly.
Using a bright color as my neutral base, I understood I was walking a fine line between romantic original and overdone quirk. Knowing that a little bit of complimentary color goes a long way, I considered a few very basic accessories.
- Shoes: Obviously. And again, considering the context, the shoe needs to be satin or fabric--no fuschia leather shoes for the schmancy wedding (a strappy shoe in metallic leather would be the exception). So far, I like the uniqueness of these, the boldness of these, and the glamour of these.
- Bag: Something just big enough to hold money, keys, phone, Metrocard, and makeup. And again, I'm skipping the leather.
- Hair adornment: Now this is a bit more interesting. Since I have short hair, I miss out on the lushness of a sweeping up-do with wisps of delicate curls blowing in the summer breeze. Instead, I'm seeking out an understated flower accessory for my hair, to echo the botanical surroundings and the femininity of the dress, and also to bring some rosey tones up near my face.
- Jewelry: I'm keeping it simple by sticking to the precious metals and stones. Again, metallics are the ultimate neutrals--you can't ever go wrong with gold or silver. Since I'm using my accessories to add warmth to my overall look, I'll be relying on golds to bring out the peaches in my skin and the spice-tone of my many freckles.
- Makeup: Don't forget, makeup is an accessory too! I'm undecided on the makeup look so far, though I'll be playing with a warm, sheer lip and a sweep of gold on the lids. I also think I'll try a bit of ruby and shine on the lips, to explore whether the drama of the dark pout enhances or undermines the look.
I have my dress a full five months in advance of the wedding, so I've got plenty of time to shop around for just the right rosey tones to build my ideal look. And with free shipping and free returns at Zappos, I could easily order ten pairs of heels in shades of magenta, plum, and scarlet and have a fashion show in my very own living room.
I'll also be thinking about family jewelry. Not heirlooms, mind you, but I'll see what delicate gold pieces my mother's picked up over the years, because often the perfect piece with just the right amount of age and personality is sitting in a jewelry box in the closet.
Regarding hair adornments, I have full faith that Etsy will come through for me with a unique, picture-perfect piece, though it may take patience and digging to find it.
Rule #6: Try it on together, and try more than one look!
There's no harm in working an outfit a few different ways. The more looks I can create with accessories, the better my chances are that I'll find the perfect look for the wedding and be inspired to wear the dress again. Having too many fabulous ways to wear a dress is a good problem.
I'll be posting pictures of my adventures in accessorizing as I gather the materials, so stay tuned. In the meantime, email me with suggestions for my "It's Not Hard to..." series. Thanks for reading my very first style post!
Labels:
accessories,
dress,
neutrals,
weddings
Subscribe to:
Posts (Atom)